Tips for taking your own photos
If a photographer is unavailable, please consider the following tips when taking your own photos:
At lectures, you often see and hear professional photographers clicking away. That’s because people frequently do not look their best while speaking, and the photographers are taking as many shots as possible to try to get that one good shot.
-
A trick of professional photographers that you can use is to arrive early and take setup shots of the speaker at the podium prior to the actual event. This way, you can get closer to the subject (5 to 6 feet away), better control the photo, and not disrupt the flow of the speaker’s presentation.
-
Keep in mind that the flash on your point-and-shoot camera is of little use when photographing a speaker from a distance in a large room.
-
The flash will not be sufficient to light the room, so the best strategy is to use available light.
-
Available light is any light already in the room: artificial, natural or combination of the two.
Your point-and-shoot camera is not ideal for photographing groups of people in motion, e.g., clapping hands, shaking hands, presenting awards. You will be better off taking a posed group shot where the subjects are standing still.
-
Try to limit the group to three to five people and stand 5 to 6 feet away.
-
Available light is best, but you can also try some shots with the flash.
-
Try to keep the group at least 10 feet away from a wall or other background.
-
Don’t be reluctant to fill the frame with people.
How you photograph an individual will depend on whether you are shooting indoors or outside.
-
When shooting indoors, try to use indirect window light. Avoid using a flash, which can cause red-eye and shadows.
-
When shooting outdoors, open shade or an overcast day is best for avoiding shadows. Place the subject in an area with a nondescript, generic background at least 10 feet away from a wall, tree, etc. Be conscious of avoiding lines in the background—poles, lines on a building, utility wires, etc.—that can look like arrows bisecting the subject’s head.
-
Don’t be reluctant to fill the frame.
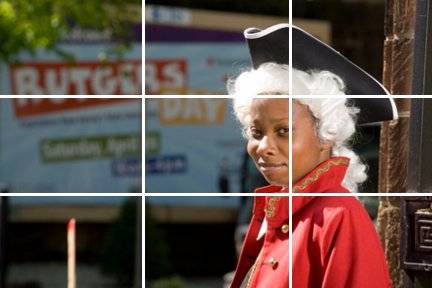
When deciding where to place your subject(s), try to avoid centering, which can result in a static, boring photo. Rather, keep in mind the universal rule of thirds.
-
Imagine the frame divided equally into nine parts by two equidistant horizontal lines and two equidistant vertical lines.
-
Place your subject(s) on one of these lines or at an intersection of these lines to take a more dynamic photo.
-
Keep in mind that the viewer’s eye will be drawn to whatever is brightest in the frame.
Resolution can be expressed as DPI (dots per inch) or PPX (pixels per inch).
-
Higher resolution photos are required for reproduction in print. Standard print resolution is 300dpi. With digital printers you can sometimes use fewer dots per inch, although the image must have enough data in it to stretch the pixels.
-
Lower resolution photos are appropriate for reproduction on websites and other electronic media. Standard web resolution is 72dpi.
-
As a general rule, lose resolution images lose quality if they are resized larger than their original size.